🧑Invite your team
Fieldworker platform is more valuable when all your team is using it
Fieldworker tip: Discuss Fieldworker and how it will improve and enhance the daily experience of your employees. Walk them through the process to set up their personal account after receiving the invitation email.
Adding your employees and team members
To invite your team to join your agency on FieldWorker, you'll need to be an admin. The admin will usually be whoever sets up FieldWorker for an agency to begin with.
Where to add team members
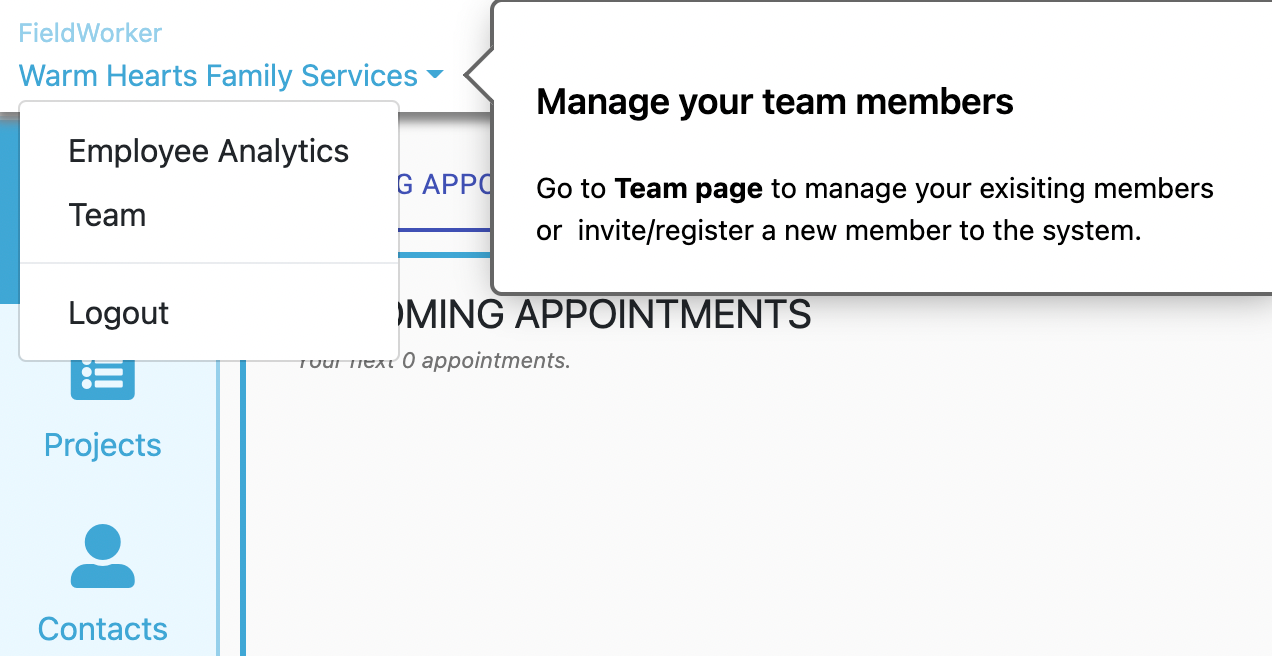
Once you've logged into FieldWorker, click on the name of your agency in the top left-hand corner.
You'll see several options from here in a drop-down menu. Under "Team", you'll be able to see your team members as well as invite new team members and assign roles.

Alternatively, you can go to "New" in the sidebar, and then select "Employees" and add employees via this interface.

Make sure you enter their email addresses correctly – this is where we'll send their welcome email and credentials!
Tell your team to check their email!
Once you've added a team member, they'll receive a welcome email from FieldWorker together with their credentials. They should click on the link in this email and use these credentials to set up their account.
Important! Your team shouldn't go ahead and create their own accounts before you invite them! They'll need to accept your invitation, otherwise, their account won't be linked with your agency!
What should you do if you have been invited to your agency's Fieldworker account?
All new employees are invited as Fieldworkers, but an admin may assign them a different role.
Once you've logged into FieldWorker, click on the name of your agency in the top left-hand corner.
Here, you'll see an option for "Teams". Here, you'll be able to see an overview of your team who have joined you on FieldWorker, in addition to their usernames and designations.
"Designation" refers to their role on the FieldWorker platform. This corresponds with their level of access. You can select team members using the checkbox here and change their designation if needed.

How to accept an invite and setup your personal account?
So you're going to be using FieldWorker! Welcome! Here's how to set up your account.
Check your email for an invite!
Your administrator will invite you to join FieldWorker – if you don't see an email, make sure to ask them if they've invited you! They'll need to enter your email address, as this is where you receive your invite.
Important! Don't create your own account before this! You'll need to set up your account by clicking on the link in your invite so that you're linked with your agency.
Your invite email contains your unique FieldWorker credentials – that is, a username and password that you'll need to use to access your account.

Make sure you use these credentials to log in to Fieldworker, and not your own email address! To comply with HIPAA regulations, we provide your credentials via Microsoft.
Now, click on the button in your email, and you'll be taken to the page to log in to your account.
Update your password
Log in using the credentials from your welcome email. Once you have done this, you'll be prompted to set a new password for your account.
Set up 2FA
2FA stands for 2 Factor Authentication and adds a layer of security to your FieldWorker account in addition to your password. This may involve linking your account with another email address or phone number and receiving a code to use to log in. It could instead be setting up several personal questions that only you know the answer to in order to access your account.

You'll also need this in case you forget your password, as this will help verify that it's really you trying to access your account.
Account created!
And that's it! You've successfully created your account! Now take your time to explore FieldWorker and learn how it all works!
Your account credentials
When you first sign up with FieldWorker, you'll need to enter your email (or you'll receive an invite by email). This is where we will send your account credentials. You'll receive an email that looks like this, containing your FieldWorker username and password.

These will be the account credentials that you'll need to log in, not your email address!
The first time you log in to your account via the link in this welcome email, we recommend copying and pasting this username and password across. You'll then be prompted to change your password. Your username will stay the same (i.e., as it is in this email).
What to do if you've forgotten your User ID or password
We've all forgotten our login details at some point! No problem – simply go to the sign-in page and under the button to Sign in with Microsoft, you'll see the options to reset your User ID and Password. Click on the relevant one, and you'll be guided through the reset process to be able to access your account again.

Roles in Fieldworker
There are 4 pre-defined roles, and here's what they mean:
Admin
There will usually only be one admin user, and this will be the agency owner or whoever set up FieldWorker. Admins have the broadest overview and have access to dashboards with high-level metrics to get a pulse on how the agency is doing. They are also able to invite and remove team members.
Manager
Managers are able to see all tasks and projects for individuals within their teas, in addition to their own tasks and projects. They are able to assign tasks and projects to other team members and view timesheet entries for individuals across the team.
Fieldworker and Support Coordinator
Fieldworkers and Support Coordinators are able to see their own tasks and projects, in addition to the information such as contacts and schedules related to their own work and an overview of their individual timesheet entries.
An admin user may create new roles to match your agency's needs and business processes.
New Hire Onboarding Checklist
To ensure every new team member is set up for success, and your agency data remains secure, follow this New Hire Onboarding Checklist. This process ensures that permissions, hierarchies, and billing rules are aligned from the first day.
🚀 Phase 1: Record Creation & Invitation
Before a staff member can log in, they must be officially invited to the platform.
[ ] Send Invite: Go to the Employee tab within Settings. Scroll to the Employee Onboarding section, enter their Name and Email, and click Invite.
[ ] Set Designation: Once the user joins, locate them in the Employee List and ensure their Designation (e.g., Fieldworker, Manager, Support Coordinator) is correctly assigned.
[ ] Assign Office/Branch: If your agency has multiple locations, ensure the employee is assigned to the correct office in their profile settings.
🔐 Phase 2: Security & Permission Configuration
Click the User Icon on the employee's row to open the Set Permissions modal.
[ ] Select App Access: * For field staff, ensure all Mobile App Screens (Tasks, Timesheets, Customers) are checked.
For office staff, ensure Web Portal access is granted.
[ ] Restrict Sensitive Data: Double-check that Billing and Company Reports (Payroll) are unchecked unless strictly required for their role.
[ ] Save: Click the blue [SAVE] button at the top of the modal.
📂 Phase 3: Operational Hierarchy
Linking employees ensures that supervisors can see their team's documentation and timesheets.
[ ] Establish Relationships: Use the Employee Relationship tool on the Settings page.
Select the Supervisor.
Link the New Hire as a "Reportee."
[ ] SOS Safety: Toggle the SOS Status to Active if the employee will be working in the field and requires emergency alert capabilities.
🧪 Phase 4: Final Verification
Before their first shift, perform a quick "Sync Check."
[ ] Form Visibility: Ensure the Forms required for their specific tasks (mapped in Advanced Settings) appear correctly on their device.
[ ] Timesheet Test: Confirm the employee can successfully start a Timesheet and select the appropriate service task.
Pro Onboarding: Create a "dummy" customer and task for new hires to practice on. This allows them to test the Mobile App without affecting live billing data.
📧 New Hire Welcome Email Template
This welcome email is designed to be sent to your new hires immediately after you've sent their system invitation. It provides them with the necessary context to get started and reduces the initial "how-to" questions.
Subject: Welcome to the Team! Getting Started with Fieldworker
Dear [Employee Name],
Welcome to the agency! We are excited to have you on board.
To manage your daily schedule, track your time, and document your visits, we use a platform called Fieldworker. You should have received an automated invitation email to create your password; please complete that step before following the instructions below.
📱 Step 1: Download the Mobile App
Fieldworker is designed to be used on the go. Please download the app on your smartphone:
iOS: Search "Fieldworker" in the Apple App Store.
Android: Search "Fieldworker" in the Google Play Store.
🔑 Step 2: Log In and Explore
Once the app is installed, log in using your email address and the password you just created. You will see several icons at the bottom of your screen:
Home: Your daily overview.
Scheduler: This is where you will see your assigned visits and tasks.
Customers: Access contact information and directions for the clients you serve.
📝 Step 3: Your First Task
To get comfortable with the system, please complete your first "Check-in" today:
Go to the Scheduler tab.
Tap on the task assigned for today.
Click "Start Activity" to begin your timer.
If a Form is linked (like a Progress Note), fill it out and tap "Submit."
Click "End Activity" to finalize your Timesheet.
🆘 Need Help?
If you run into any issues logging in or navigating the app, please reach out to [Manager Name/IT Support] at [Phone/Email].
We look forward to seeing you in the field!
Best regards,
[Your Name/Agency Name]
Admin Note: Ensure you have already completed the "Task Mapping" in the Advanced Settings so that the forms and tasks appear correctly when your new hire logs in for the first time.
Last updated